
Imaging Asteroids
Imaging Asteroids
While asteroids do not share the stunning beauty of their solar system cousins the comets, they are worthy CCD targets nonetheless. Only the most powerful professional telescopes have the capability to resolve features on the surface of asteroids -- and then only the closest or largest asteroids. The best we amateur astronomers can hope for is a star-like image. So why bother? Usually, the average backyard imager will only be drawn to image a rare occurrence, such as a near-Earth asteroid passing close to our planet. These small chunks of spacerock are still seen only as pinpoints, but their rapid motion against the background of distant stars makes it possible to show motion in outer space. Everything in the universe is moving, but the universe is so huge that motion is rarely seen on short timescales. Amateur CCD imagers now routinely make movies showing near-Earth asteroids cruising through star fields.
Another consideration is scientific in nature. In the 200 years since asteroids were first discovered, relatively little has been learned about them. For this reason, amateur astronomers can still make valuable contributions to science by studying certain properties of asteroids observable in even modest backyard telescopes. CCD cameras allow accurate measurements of position and brightness to be taken. Positional measurement (astrometry) is useful for more accurately determining an asteroid's orbit. Often, only amateur astronomers can follow up on a new discovery, preventing a newly-found asteroid from being lost before its orbit is determined. Brightness measurements (photometry) of asteroids are used to determine light curves, plots of how an asteroid's brightness changes with time. Photometric observations give information on the rotation and composition of an asteroid.
Finding Asteroids
The first step in imaging an asteroid is to find it up there among all those stars. While comets are easy to pick out once their position has been determined, finding an asteroid can be trickier due to its stellar appearance. If a detailed star chart is available showing stars down to the magnitude of the asteroid, finding the right target can be made easier. Software packages such as Starry Night or The Sky are ideal as they can plot the exact position of an asteroid from known orbital elements and a finder chart can be created to match the CCD's field of view and orientation.
The online source for asteroid information and orbital elements is the International Astronomical Union's Minor Planet Center (MPC) website. Everything you need to know about finding asteroids, the latest news, and information for carrying out astrometric or photometric studies is available there:
http://cfa-www.harvard.edu/iau/mpc.html
Imaging Tips
When imaging a rapidly-moving asteroid, be sure to keep the individual exposures short enough that the asteroid does not trail during an exposure. Even with very faint asteroids this should not be a problem. Most amateur CCD equipment can capture stars (or asteroids since they are stellar in appearance) as faint as 18th magnitude in about 1 minute or so. As an example, asteroid 1998 SF36 passed within 1.3 million miles (5 lunar distances) of Earth in late June, 2004. When it was faint, in early June, at about 18th magnitude, the asteroid was moving along at a relatively pokey 1" (one arcsecond) per minute of time. Since most imaging systems are not able to resolve much below 2 arcseconds during longer exposures, this is no problem. Once the asteroid was close, it was moving at a much more rapid pace of about 10" per minute, but it was be bright enough (12th magnitude) to be captured in a 5-second exposure, keeping the target a pinpoint.
Making a Movie
There are several ways to go about combining multiple images into a time-lapse sequence showing an asteroid's motion through the sky. Perhaps the simplest way is to determine beforehand the approximate direction of motion for the asteroid and to place it in the field of view so that it stays within the field while moving. Afterwards it is a simple procedure to combine the files by aligning the stars in each image. In this movie the stars remain fixed and the asteroid moves through the field. Another method it to keep the asteroid centered in each exposure and to align the images later on the asteroid rather than on the stars. In this movie, the asteroid is the center of attention and the stars zip past. This is a more dramatic presentation, but a bit trickier to pull off. One way to do this is simply to keep re-centering the asteroid after each exposure (giving a few minutes between each shot for the asteroid to move). Any imperfections in centering are easily cropped out later; after all, a large field of view is not really necessary for a pinpoint target, so cutting off the edges is not so bad. If money is no object, some advanced telescope mounts are capable of simply tracking the asteroid based on the orbital elements of the target, keeping the asteroid perfectly centered in each exposure without any effort on the part of the observer.

Above: Movie of near-Earth asteroid Hermes, passing near Earth on October 26th, 2003. Ten 5-second exposures were taken at 1 minute intervals. This image was taken from the Starizona parking lot, and the variation in background brightness is actually a power line passing through the image. It's amazing what CCD technology allows to be done under less-than-ideal conditions!
Using Software to Plan an Image
Suppose you wish to capture asteroid 1998 SF36's close approach to Earth in 2004. Any of the better software packages available will allow the user to enter orbital elements of an asteroid and see where it will be in the sky on any given date. Also, field of view indicators are available to display what your CCD camera and telescope combination will see.
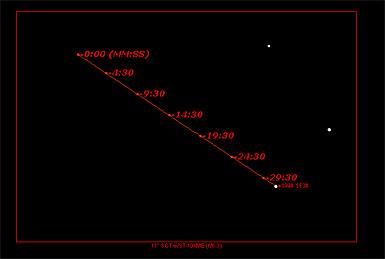
Below is a screenshot from Starry Night Pro showing the position of 1998 SF36 on June 26, 2004, the date of closest approach. A field of view indicator has been selected for the telescope and CCD camera. Using the Track Celestial Path function, about 30 minutes of time was played to see the motion of the asteroid. It can be seen that, with the camera oriented as shown with the Field of View Indicator, an exposure every minute for half an hour would make for a nice movie of the asteroid sailing past the stars. Keep in mind that many more stars would be visible in the CCD image; the faintest stars were turned off in the software to keep from cluttering the image.

Above: Field of View Indicator showing the path of asteroid 1998 SF36 over the course of 30 minutes on June 26, 2004, from eastern Australia, beginning around 4 AM local time. For those of us in the northern hemisphere, this image was not possible, demonstrating another nice feature of computerized planetarium programs: the ability to travel anywhere in the world without leaving your home!