
Color Imaging
LRGB
In the Basics of CCD Imaging section, only RGB imaging was discussed. The shortcoming of RGB imaging is that the individual filters cut down on the amount of light reaching the CCD. An image through the clear filter will yield much more detail and information than an image through a color filter. LRGB imaging allows you to combine a deeper black-and-white image with a color RGB image to bring out more detail than the RGB would have alone. Also, it is possible to bin the color images to reduce overall exposure time.
How Does LRGB Work?
In an RGB image, exposures through red, green, and blue filters are combined to create a color image. This works because the human eye sees color as a combination of these three primary colors. The cones in our eyes are of three types, sensitive to either red, green, or blue. As it turns out, however, humans get primarily color data from these cones, and not spatial information (detail). The spatial information comes from the rodsin the eye, which are not particularly sensitive to color. This means that combining a high-resolution black-and-white image with low-resolution color images will yield a high-resolution color image, because we don't get the resolution data from the color images. Essentially an RGB image "paints" a high-res black-and-white image and none of the spatial data is lost.
Note: For more detail on the workings of the eye and color in CCD imaging, see the CCD Theory page on true color imaging.
Simply put, we see mostly color data from the RGB portion of an image. The Luminance part of the image contributes the detail to an image. The red, green, and blue images become the RGB part of the final picture. The more detailed image is used as the Luminance channel and the whole thing becomes LRGB.
Don't worry, this will all make sense when you see some images below!
Types of LRGBs
Equal LRGB
There are a variety of ways to go about taking LRGB images. The simplest method is to take exposures through clear, red, green, and blue filters. The clear-filtered exposure is then used as the Luminance channel in the LRGB image. Again the idea is that by combining the RGB image -- which will have less information than the L image -- with a more detailed clear-filtered image, the final picture will have the detail of the clear image but the color from the RGB image.

Above: A standard RGB image of M51.

Above: An LRGB using the same RGB data.
Binned-Color LRGB
For a simple LRGB like the one above, equal exposure times can be used for each image. However, there is much less data in the color files due to the light loss from the filters. This means that to compensate for the lack of color data, the color images should really be 3 times longer than the luminance exposure. Another popular method of LRGB imaging is to bin the color images but to leave the L image at full resolution. This is possible because the detail in the final image will come from the Luminance file, not from the color files.
Begin by taking a sequence of luminance images. Then, bin the CCD either 2x2 or 3x3 and take the color images. The idea is to get the color files to nearly equal the luminance files in terms of the faintest detail visible. If you bin 2x2, equal exposures for both the clear and color images will come very close to yielding equivalent data. The reason for this is that the color filters allow 1/3 of the light to pass that normally gets to the CCD during an unfiltered exposure. However, binning 2x2 makes the camera 4 times more sensitive. The most common method is to bin 3x3, which makes the camera 9 times more sensitive and reduces the RGB exposures to about 1/3 the length of the luminance exposure. Later, when processing these files, the RGB images are resized to match the L image. Despite the fact that, individually, the color files will look more or less awful, when combined with the L image, the final LRGB will have the same level of detail as the clear image.
Narrowband LRGB
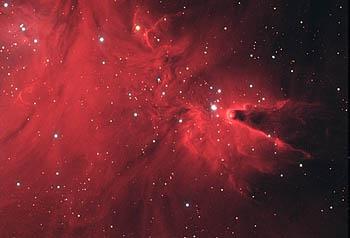
When imaging nebulae it is common practice to use narrowband filters to isolate a particular interesting wavelength of light. Most emission nebulae give off light predominantly at a wavelength of 656.3nm. This light comes from ionized hydrogen and is known as hydrogen-alpha light. Using a hydrogen-alpha filter captures only the light emitted at this wavelength and is an excellent way to get very detailed, deep images of nebulae, even from light-polluted areas. To create a color picture from this narrowband filter, the LRGB method is used. The narrowband image becomes the L channel in place of the normal clear filter. In the case of an H-alpha image, this would usually be termed an HaRGB image.
Note: For more details on using an H-alpha image as the luminance component in an LRGB image, see the Software Instructions page on creating an HaRGB in Photoshop.

Above: LRGB created using an H-alpha luminance layer.
AnythingRGB
In fact, just about any image can be used for a luminance image. Instead of an H-alpha filter, sometimes simply a red-filtered exposure is used for the L image to create an RRGB. A longer, high-resolution red image is taken of a nebula and then shorter, binned RGBs are used for color. You can even combine H-alpha and red exposures, or red and blue exposures, or whatever you like, to create an L image. This is why you sometimes see (RB)RGB images and the like.
For capturing incredible amounts of detail, very long exposures (or lots and lots of shorter exposures) are combined to create a highly detail L image. This data might be accumulated over several nights. Then, shorter RGBs can be used to color the image.
It is even possible to use data from different CCD cameras or even different telescopes to create LRGBs. If you have a very high-resolution black-and-white image of an object through a long-focal-length telescope, and a lower-resolution RGB from a smaller scope, a high-res LRGB can easily be made.


Above: A low-resolution color image and a high-resolution black-and-white image of the Lagoon Nebula.

Above: Resizing the smaller RGB image and using the black-and-white as a luminance layer creates a high-res LRGB image.
Sequencing
The sequencing techniques outlined in the previous section can be easily applied to color imaging as well. Most software packages allow you to set up an automated sequence for color imaging with just about any number of filters. In this way RGB images can be taken, as well as LRGBs using either the clear filter for the L image or using a narrowband filter or combination of filters for the L channel.

Above: An example of an LRGB sequence setup in MaxIm DL.